
Red velvet cookies recipe are a delightful twist on the classic red velvet cake, offering the same rich cocoa flavor and vibrant red hue in a soft, chewy cookie form. Perfect for holidays, special occasions, or simply indulging in a sweet treat, these cookies bring together the best of chocolate and vanilla flavors with a hint of tanginess from buttermilk or vinegar. Their signature red color makes them visually appealing, while the addition of white chocolate chips or cream cheese filling takes their taste to the next level.
In this recipe, we’ll guide you through the step-by-step process of making the perfect red velvet cookies from scratch. Whether you’re a beginner or an experienced baker, this easy-to-follow guide will ensure that your cookies turn out soft, moist, and irresistibly delicious. Get ready to bake a batch of these festive and flavorful cookies that will impress family and friends alike!
The Origins of Red Velvet Cookies Recipe
The history of red velvet cookies recipe desserts dates back to the 1800s when cocoa powder was first used in cakes to create a smoother, velvety texture. The natural chemical reaction between cocoa powder and acidic ingredients like vinegar or buttermilk often resulted in a reddish-brown hue. Over time, this effect was enhanced with food coloring, giving birth to the vibrant red velvet we know today.
Red velvet cake gained widespread popularity in the United States, particularly after being featured at the famous Waldorf Astoria Hotel in New York City during the 1920s. Later, in the 1940s and 50s, food dye companies began marketing red food coloring as an essential ingredient in red velvet recipes, cementing its place in American dessert culture.
Today, red velvet cookies recipe are a beloved spin on the classic cake, offering all the flavor and texture in a convenient, handheld form.
What Makes Red Velvet Cookies Recipe Unique?
From other cookies due to their distinct flavor and texture. While they contain cocoa powder, they aren’t quite chocolate cookies—they have a much milder cocoa taste balanced by a subtle tang from buttermilk or vinegar. Additionally, they have a chewier, softer texture compared to regular chocolate cookies, often enhanced by ingredients like cornstarch or extra egg yolks.
The deep red color also makes them visually appealing, especially when topped with white chocolate chips, cream cheese frosting, or rolled in powdered sugar for a crinkle effect.
What to Expect in This Recipe
In the next sections, we’ll cover:
The essential ingredients that give red velvet cookies their perfect taste and texture.
Step-by-step instructions for making the cookies from scratch.
Fun variations, including cream cheese-stuffed red velvet cookies.
Pro baking tips to help you achieve the perfect chewy consistency.
Answers to common questions about red velvet cookies.
Essential Ingredients for Red Velvet Cookies Recipe
Before diving into the step-by-step recipe, let’s break down the key ingredients that make red velvet cookies so special. Each ingredient plays a crucial role in texture, flavor, and color, so understanding them will help you achieve the perfect cookie.
Key Ingredients Breakdown
1. All-Purpose Flour
Flour provides the structure for the cookies. Using all-purpose flour ensures they hold their shape while staying soft and chewy. Measuring the flour correctly is crucial—too much can make the cookies dry and dense, while too little may cause them to spread too much.
2. Unsweetened Cocoa Powder
While red velvet isn’t as chocolatey as traditional chocolate cookies, cocoa powder gives it a mild chocolate flavor. The key is to use a small amount—about 1 to 2 tablespoons—to maintain the red color without overpowering the taste.
Types of Cocoa Powder:
- Natural Cocoa Powder – Has a slightly acidic pH, which enhances the red color.
- Dutch-Processed Cocoa Powder – Has a smoother flavor but is less acidic, so the red color may not be as vibrant.
🔹 Tip: If you want a deeper red color, use natural cocoa powder rather than Dutch-processed.
3. Baking Soda or Baking Powder
A leavening agent helps the cookies rise and gives them a soft texture. Many recipes use baking soda, which works well with the acidic ingredients (like buttermilk and vinegar) to create a light, tender texture.
4. Butter vs. Oil – Which One is Better?
Most recipes use unsalted butter, which gives the cookies a rich, buttery taste while keeping them soft. However, some variations use oil for an even softer texture.
- Butter-based cookies – More flavor, slightly crisp edges.
- Oil-based cookies – Extra soft and moist but slightly less flavorful.
🔹 Tip: For the best results, use softened butter at room temperature, not melted, to maintain structure while baking.
5. Buttermilk or Vinegar – The Secret to Authentic Red Velvet Cookies Recipe Flavor
Red velvet desserts have a subtle tangy flavor, achieved through buttermilk or a vinegar and milk substitute. This acidity reacts with the cocoa powder and leavening agents, enhancing the red color while giving the cookies their signature taste.
- If you don’t have buttermilk, you can mix 1 teaspoon of vinegar or lemon juice into ¼ cup of milk as a substitute.
6. Red Food Coloring – Getting the Perfect Shade
The signature red color is achieved with food coloring. While liquid red food dye works fine, gel food coloring is preferred because it is more concentrated and vibrant.
🔹 Tip: If you prefer a natural alternative, beet powder or red dragon fruit powder can be used instead of artificial dyes.
7. Egg – The Binding Agent
Eggs add moisture and structure. Many recipes use one large egg, but adding an extra egg yolk can make the cookies richer and chewier.
8. Cornstarch – The Secret to Soft Cookies
Adding a teaspoon of cornstarch helps create a super soft and thick cookie texture, preventing excessive spreading.
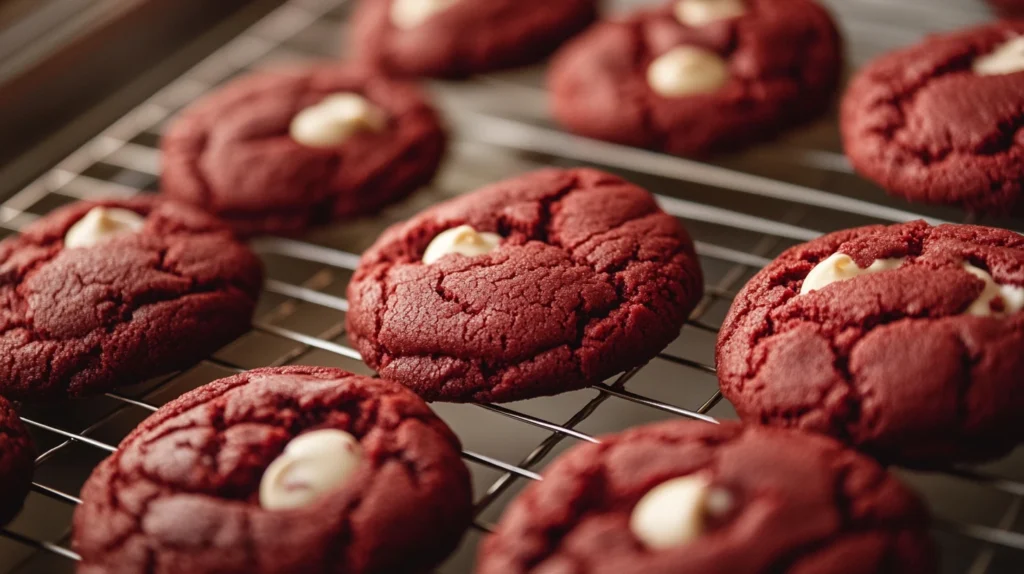
9. White Chocolate Chips or Cream Cheese – The Perfect Additions
Red velvet cookies taste amazing with mix-ins like white chocolate chips, cream cheese filling, or nuts. The white chocolate complements the slight cocoa flavor and enhances the cookie’s sweetness.
Choosing the Right Cocoa Powder for Red Velvet Cookies Recipe
Since cocoa powder is an essential ingredient in red velvet cookies, choosing the right type will affect the taste and color of the final product.
| Cocoa Powder Type | Flavor Profile | Impact on Red Color |
|---|---|---|
| Natural Cocoa Powder | Slightly acidic, stronger cocoa taste | Enhances the red color naturally |
| Dutch-Processed Cocoa | Milder, less acidic | Can darken the red color |
🔹 Best Choice: Natural cocoa powder if you want a brighter red hue and an authentic red velvet taste.
The Role of Vinegar and Buttermilk in Red Velvet Cookies Recipe
One of the key differences between red velvet cookies and regular chocolate cookies is the use of acidic ingredients like vinegar and buttermilk. These ingredients:
Enhance the tangy flavor that defines red velvet.
React with baking soda, making the cookies rise and stay soft.
Bring out the red color in natural cocoa powder.
Step-by-Step Red Velvet Cookies Recipe
Now that we understand the ingredients, let’s dive into the exact process of making the perfect red velvet cookies. This recipe will give you soft, chewy cookies with a rich red hue and a hint of chocolate flavor.

🍪 Ingredients List & Measurements (Yields about 18-20 cookies)
1 ¾ cups (220g) all-purpose flour
2 tbsp (15g) unsweetened cocoa powder (natural preferred)
1 tsp baking soda
1 tsp cornstarch (for extra softness)
½ tsp salt
½ cup (115g) unsalted butter, softened
¾ cup (150g) granulated sugar
¼ cup (50g) brown sugar (light or dark)
large egg
1 tbsp buttermilk
1 tsp vanilla extract
white vinegar
1 tbsp red gel food coloring
¾ cup (130g) white chocolate chips
Combining Wet & Dry Ingredients
4️⃣ Gradually add the dry ingredient mixture to the wet ingredients. Mix on low speed just until combined. Do not overmix—this keeps the cookies soft and chewy.
5️⃣ Gently fold in the white chocolate chips (if using).
Chilling the Dough
6️⃣ Cover the dough with plastic wrap and chill in the refrigerator for at least 1 hour (or up to 24 hours).
💡 Why chill the dough?
Prevents cookies from spreading too much.
Enhances the flavor by allowing the ingredients to meld.
Gives a chewier texture.
🔹 Baking Tips for Perfect Cookies:
✅ If you want a slightly cracked top, gently press down on each dough ball before baking.
✅ Do not overbake! The cookies should look slightly underdone in the center when removed.
Cooling and Serving
🔟 Let cookies cool on the baking sheet for 5 minutes before transferring them to a wire rack to cool completely.
🍪 Enjoy warm or store in an airtight container for up to 5 days!
Want to Get Creative?
In the next section, we’ll explore fun variations like:
Cream Cheese-Stuffed Red Velvet Cookies
Red Velvet Crinkle Cookies
Gluten-Free & Vegan Options
Delicious Variations of Red Velvet Cookies Recipe
Now that you’ve mastered the classic red velvet cookie, let’s take it up a notch with some exciting variations! Whether you love gooey fillings, powdered sugar coatings, or need a gluten-free option, these versions will satisfy every craving.
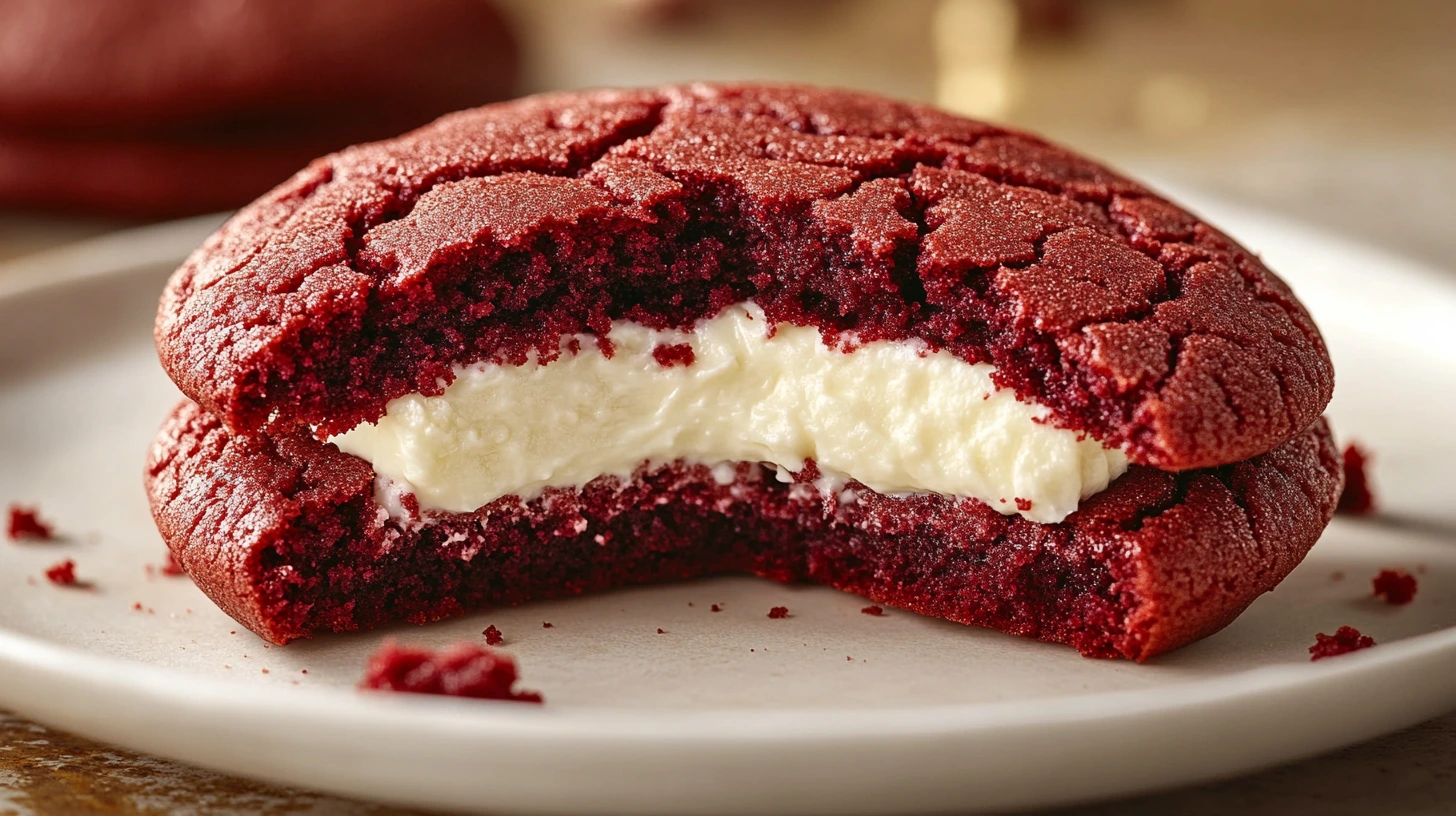
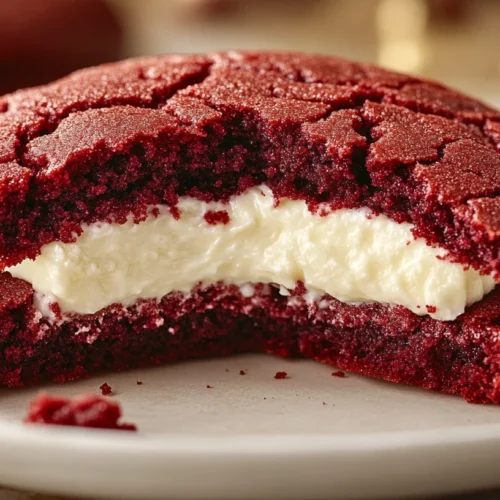
1. Cream Cheese-Stuffed Red Velvet Cookies Recipe 🧀🍪
If you love cream cheese frosting, why not take it inside the cookie? These stuffed red velvet cookies have a rich, tangy cream cheese center that pairs perfectly with the chewy red velvet exterior.

📝 Ingredients (Extra for Filling)
4 oz (115g) cream cheese, softened
¼ cup (30g) powdered sugar
½ tsp vanilla extract
🛠️ How to Make It:
Prepare the filling: In a small bowl, mix cream cheese, powdered sugar, and vanilla extract until smooth. Cover and freeze for 20 minutes (this makes stuffing easier).
Scoop dough: Take 1.5 tablespoons of cookie dough and flatten it in your palm.
Add filling: Place ½ teaspoon of cream cheese mixture in the center.
Seal it up: Gently fold the dough over the filling, rolling into a smooth ball.
Bake as per the original recipe (350°F for 10-12 minutes).
💡 Pro Tip: These taste even better after chilling for a few hours, as the flavors blend beautifully!
2. Red Velvet Crinkle Red Velvet Cookies Recipe ❄️
Crinkle cookies have a classic cracked, powdered sugar exterior, making them extra festive for holidays.
📝 Additional Ingredient:
✔ ½ cup (60g) powdered sugar (for rolling)
🛠️ How to Make It:
1️⃣ After chilling the dough, roll each dough ball in granulated sugar first, then coat it heavily in powdered sugar.
2️⃣ Bake at 350°F (175°C) for 10-12 minutes until cracks form.
3️⃣ Let cool and dust with more powdered sugar if needed.
💡 Pro Tip: For a more dramatic crinkle, make sure your dough is cold before rolling in sugar!
3. Red Velvet Cookies Recipe with Dark Chocolate Chunks 🍫
For a richer, bolder flavor, swap white chocolate chips for dark chocolate chunks.
📝 Ingredient Swap:
✔ Use ¾ cup (130g) chopped dark chocolate instead of white chocolate chips.
🔹 Why This Works: The slightly bitter dark chocolate enhances the cocoa flavor, making these cookies deeply indulgent.
4. Gluten-Free Red Velvet Cookies Recipe 🌱
Need a gluten-free version? This simple swap ensures that everyone can enjoy these delicious cookies!
📝 Gluten-Free Ingredient Swaps:
✔ Use 1 ¾ cups (220g) gluten-free all-purpose flour (with xanthan gum added).
✔ Check that your baking powder, cocoa powder, and food coloring are gluten-free.
🔹 Tip: Gluten-free dough tends to be stickier, so chilling for at least 2 hours is recommended for better handling.
5. Vegan Red Velvet Cookies Recipe 🌿
Want a dairy-free and egg-free version? Here’s how to tweak the recipe:
📝 Vegan Ingredient Swaps:
Butter → ½ cup (120ml) coconut oil or vegan butter
Egg → 1 flax egg (1 tbsp flaxseed meal + 2.5 tbsp water, let sit for 5 min)
Buttermilk → Almond or soy milk + ½ tsp vinegar
White chocolate chips → Vegan chocolate chips
🔹 Tip: Vegan cookies may take 1-2 minutes longer to bake since they have more moisture.
Which Variation Will You Try?
Now that you have several delicious red velvet cookie variations, you can mix things up for different occasions! 🎉
Pro Tips for Perfect Red Velvet Cookies Recipe
Now that you know how to make classic and creative variations of this red velvet cookies recipe, let’s dive into expert baking tips to ensure your red velvet cookies turn out soft, chewy, and picture-perfect every time. This red velvet cookies recipe is designed to help you avoid common baking mistakes, so you can achieve bakery-quality results at home. Plus, we’ll cover the most frequent issues people face when making red velvet cookies and how to fix them! Whether you’re baking for a special occasion or just satisfying a sweet craving, these red velvet cookies recipe tips will guarantee delicious results.
1. How to Get the Perfect Soft and Chewy Texture
🔹 Chill the Dough – This prevents the cookies from spreading too much and makes them thicker and chewier. A minimum of 1 hour is recommended, but overnight chilling gives the best results.
🔹 Use More Brown Sugar – Brown sugar retains moisture, making cookies softer and richer. A ¾ to ¼ ratio of brown to white sugar works best.
🔹 Do Not Overmix the Dough – Overmixing creates tough cookies. Mix the dough just until combined after adding the dry ingredients.
🔹 Do Not Overbake – Cookies should look slightly underdone when removed from the oven. They will continue cooking as they cool on the baking sheet. 10-11 minutes at 350°F (175°C) is ideal.
🔹 Use Cornstarch – Adding 1 teaspoon of cornstarch helps achieve a tender, bakery-style texture.
2. Avoiding Common Baking Mistakes
🚫 Mistake #1: Cookies Spread Too Much
✅ Solution: Ensure the butter is soft but not melted and chill the dough before baking.
🚫 Mistake #2: Cookies Are Too Dry
✅ Solution: Overbaking or using too much flour can dry out cookies. Measure flour correctly using the spoon-and-level method, and remove cookies when the edges are set but the center looks slightly soft.
🚫 Mistake #3: Cookies Lack a Vibrant Red Color
✅ Solution: Use gel food coloring instead of liquid for a more intense red hue. Natural cocoa powder also helps maintain color.
🚫 Mistake #4: Dough Is Too Sticky to Handle
✅ Solution: If your dough is too sticky, chill it for at least 1 hour before rolling. Adding 1 extra tablespoon of flour can also help.
🚫 Mistake #5: Cookies Taste Too Bitter
✅ Solution: This could be due to using too much food coloring or cocoa powder. Stick to the recommended amount, and always use high-quality ingredients.
3. How to Store Red Velvet Cookies for Maximum Freshness
✔ Room Temperature: Store cookies in an airtight container for up to 5 days. Placing a slice of bread in the container helps keep them soft.
✔ Refrigerator: If filled with cream cheese, store in the fridge for up to 7 days.
✔ Freezing Cookies: Store baked cookies in a freezer-safe bag for up to 3 months. Thaw at room temperature before serving.
✔ Freezing Cookie Dough: Roll the dough into balls, place on a baking sheet, and freeze. Once solid, transfer to a ziplock bag and freeze for up to 3 months. Bake from frozen, adding 1-2 extra minutes to the baking time.
4. Creative Serving Ideas
🍦 Ice Cream Sandwiches: Place a scoop of vanilla or cream cheese-flavored ice cream between two red velvet cookies.
🍫 Chocolate Drizzle: Drizzle melted white or dark chocolate over the cookies for an elegant finish.
🎁 Gift Boxes: Pack red velvet cookies in decorative boxes for holiday gifts.
Pair these cookies with a delicious breakfast for a sweet start to your day! Try them alongside a Easy Breakfast Quiche for a balanced morning meal.
If you love indulging in classic desserts, why not explore Crêpes and Waffles for more mouthwatering ideas?
Frequently Asked Questions
1. How to Know When Red Velvet Cookies Are Done?
Red velvet cookies are done when the edges are set but the center still looks slightly soft. The cookies should not look wet, but they should not be fully firm in the center when you take them out of the oven. They will continue to bake from residual heat while cooling on the baking sheet. A baking time of 9-11 minutes at 350°F (175°C) is ideal.
🔹 Tip: If you gently press the top and it springs back slightly, they’re ready. If they feel too doughy, let them bake for 1 more minute but avoid overbaking!
2. Why Are Red Velvet Cookies So Good?
Red velvet cookies are loved for their perfect balance of flavors and textures. Unlike regular chocolate cookies, they have a mild cocoa taste with a slight tangy flavor from buttermilk or vinegar. The soft and chewy texture, combined with a hint of chocolate and a buttery richness, makes them incredibly satisfying.
Additionally, the vibrant red color and contrast with white chocolate or cream cheese make them visually stunning and festive!
3. What Is the Best Food Coloring for Red Velvet Cookies?
The best food coloring for red velvet cookies is gel food coloring, as it provides a deep and vibrant red hue without adding too much liquid to the dough. Liquid food coloring requires a larger amount, which can dilute the dough and affect the texture.
🔹 Best Brands for Red Gel Food Coloring:
Wilton Red Gel Food Coloring
AmeriColor Super Red Gel Paste
Chefmaster Liqua-Gel Red Food Coloring
🔹 Natural Alternatives: If you prefer a natural option, you can use beet powder or red dragon fruit powder, though the color may be slightly less intense.
4. What Flavor Are Red Velvet Cookies?
Red velvet cookies have a mild cocoa flavor with a slight tanginess from buttermilk or vinegar. Unlike rich chocolate cookies, the chocolate taste in red velvet is subtle, allowing the buttery and vanilla flavors to shine through.
When paired with white chocolate chips or cream cheese, they have a unique, slightly sweet, and tangy taste that sets them apart from regular cookies.
🔹 Flavor Profile Breakdown:
Mild chocolate flavor (from cocoa powder)
Subtle tanginess (from vinegar or buttermilk)
Rich, buttery texture
Slight vanilla sweetness
Conclusion
Red velvet cookies are the perfect combination of rich cocoa, soft texture, and a hint of tanginess, making them a favorite for dessert lovers everywhere. Whether enjoyed fresh out of the oven or stored for later, these cookies are always a crowd-pleaser. By following this simple recipe, you can recreate bakery-style red velvet cookies right in your own kitchen, with the option to customize them with white chocolate chips, nuts, or even a cream cheese filling.
Now that you’ve mastered this red velvet cookies recipe, don’t hesitate to experiment with different variations and toppings to make them your own. Share them with loved ones, pack them as gifts, or simply enjoy them with a cup of milk or coffee. Happy baking! 🍪❤️
Red Velvet Cookies Recipe – Soft, Chewy, and Perfect for Any Occasion
Equipment
- ✔ Mixing bowls (one large, one medium)
- ✔ Electric mixer (or hand whisk)
- ✔ Measuring cups and spoons
- ✔ Spatula
- ✔ Baking sheet
- ✔ Parchment paper
- ✔️ Wire cooling rack
- ✔ Cookie scoop (optional)
Ingredients
- 🔹 Dry Ingredients:
- ✔ 1 ¾ cups 220g all-purpose flour
- ✔ 2 tbsp 15g unsweetened cocoa powder (natural preferred)
- ✔ 1 tsp baking soda
- ✔ 1 tsp cornstarch for extra softness
- ✔ ½ tsp salt
- 🔹 Wet Ingredients:
- ✔ ½ cup 115g unsalted butter, softened
- ✔ ¾ cup 150g granulated sugar
- ✔ ¼ cup 50g brown sugar (light or dark)
- ✔ 1 large egg
- ✔ 1 tbsp buttermilk or milk + ½ tsp vinegar as a substitute
- ✔ 1 tsp vanilla extract
- ✔ 1 tsp white vinegar enhances red color and flavor
- ✔ 1 tbsp red gel food coloring or more for deeper red
- 🔹 Mix-Ins Optional but Recommended:
- ✔ ¾ cup 130g white chocolate chips
Instructions
- 1️⃣ Preparing the Dough
- 1️⃣ In a medium bowl, whisk together the flour, cocoa powder, baking soda, cornstarch, and salt. Set aside.
- 2️⃣ In a large mixing bowl, beat the softened butter, granulated sugar, and brown sugar together using an electric mixer on medium speed for 2 minutes until light and fluffy.
- 3️⃣ Add the egg, then mix in the buttermilk, vanilla extract, vinegar, and red food coloring until well combined.
- 2️⃣ Combining Wet & Dry Ingredients
- 4️⃣ Gradually add the dry ingredients to the wet mixture, mixing on low speed until just combined. Do not overmix.
- 5️⃣ Gently fold in the white chocolate chips (if using).
- 3️⃣ Chilling the Dough (IMPORTANT!)
- 6️⃣ Cover the dough with plastic wrap and chill in the refrigerator for at least 1 hour (or up to 24 hours).
- 4️⃣ Baking the Cookies
- 7️⃣ Preheat oven to 350°F (175°C) and line a baking sheet with parchment paper.
- 8️⃣ Scoop 1.5 tablespoons of dough per cookie and roll into smooth balls. Place them 2 inches apart on the baking sheet.
- 9️⃣ Bake for 9-11 minutes until the edges are set but the center is still soft.
- 🔟 Let cookies cool on the baking sheet for 5 minutes, then transfer to a wire rack to cool completely.
Notes
Chilling the dough is crucial for thick and chewy cookies.
Do not overbake—cookies should look slightly underdone in the center when removed from the oven.
To store: Keep in an airtight container for up to 5 days at room temperature.
To freeze: Store cookie dough balls in a freezer bag for up to 3 months. Bake from frozen, adding 1-2 minutes to the baking time