

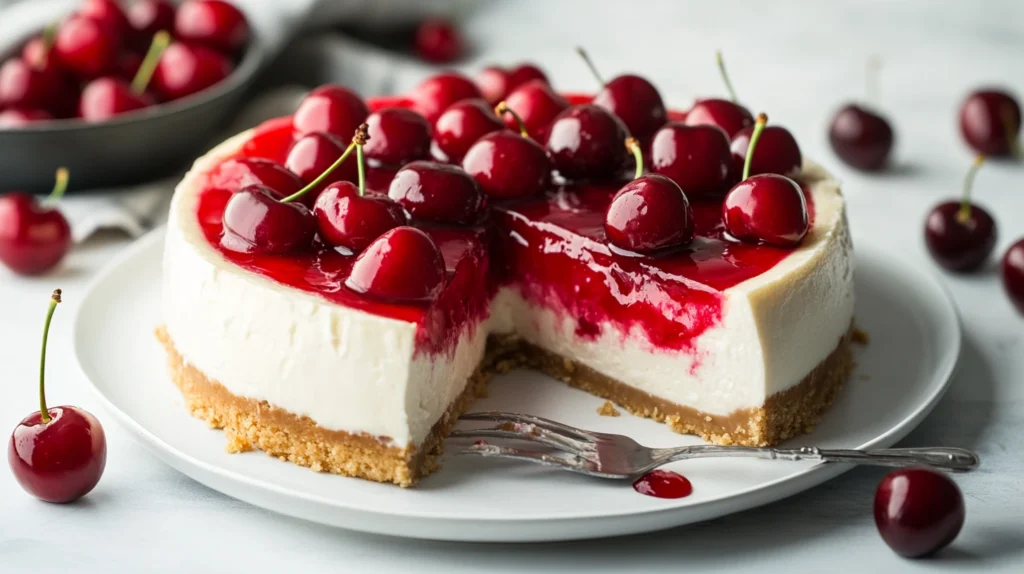
Cherry cheesecake recipe is a timeless dessert that combines a rich, creamy cheesecake base with a buttery graham cracker crust and a luscious cherry topping. Whether you’re looking for a classic cherry cheesecake recipe or a no-bake version, this dessert is a favorite at family gatherings, holidays, and celebrations. Its perfect balance of tangy and sweet flavors makes it a go-to treat for cheesecake lovers.
In this article, you’ll discover a step-by-step cherry cheesecake recipe, helpful baking tips, and common mistakes to avoid. Whether you’re a beginner or an experienced baker, this guide will help you create the perfect cherry cheesecake every time.

What is Cherry cheesecake Recipe?
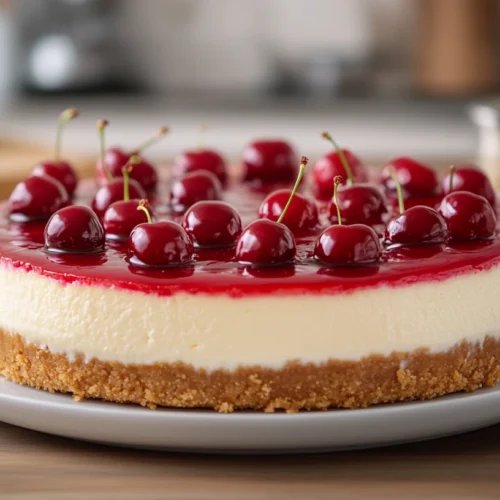
Cherry Cheesecake Recipe is a variation of classic cheesecake that features a cherry topping, usually made from fresh or canned cherries. The dessert typically consists of three layers:
- The Crust – Traditionally made from crushed graham crackers mixed with butter and sugar.
- The Cheesecake Filling – A smooth and creamy mixture of cream cheese, sugar, eggs, and vanilla extract.
- The Cherry Topping – A sweet, slightly tart cherry sauce that complements the rich cheesecake base.
There are two main types of Cherry cheesecake Recipe:
- Baked Cherry Cheesecake recipe – Uses eggs and is baked in the oven, resulting in a denser, firmer texture.
- No-Bake Cherry Cheesecake recipe – Skips the baking step and is set in the refrigerator, giving it a lighter, mousse-like consistency.
This guide will cover both versions so you can choose the one that best suits your time and skill level.
Ingredients for the Perfect Cherry Cheesecake Recipe
Creating the perfect cherry cheesecake recipe starts with high-quality ingredients. Each component plays a crucial role in achieving a rich, creamy texture and a deliciously sweet-tart flavor. Here’s everything you’ll need to make this dessert from scratch.
Essential Ingredients for a Classic Cherry Cheesecake Recipe
For the Crust:
1 ½ cups (180g) graham cracker crumbs – Provides a crisp, slightly sweet base.
¼ cup (50g) granulated sugar – Adds a touch of sweetness to the crust.
½ cup (115g) unsalted butter, melted – Helps bind the crumbs together.
For the Cherry cheesecake Recipe Filling:
- 24 oz (680g) cream cheese, softened – The star ingredient for a smooth, creamy texture.
- 1 cup (200g) granulated sugar.
- 3 large eggs – Provide structure and stability to the cheesecake.
- 1 teaspoon vanilla extract – Enhances the overall flavor.
- ½ cup (120ml) sour cream – Adds creaminess and a slight tang.
- 1 tablespoon lemon juice (optional) – Brightens the flavor and balances the richness.
For the Cherry cheesecake Recipe Topping:
- 2 cups (480g) fresh or canned cherries, pitted – The key to a vibrant, fruity topping.
- ½ cup (100g) granulated sugar – Sweetens the cherry sauce.
- 1 tablespoon cornstarch – Thickens the topping for a glossy finish.
- ½ cup (120ml) water – Helps dissolve the cornstarch.
- 1 teaspoon lemon juice – Enhances the cherry flavor.
Optional Additions to Enhance Your Cherry Cheesecake Recipe
- ½ teaspoon almond extract.
- 1 tablespoon cocoa powder in the crust – Adds a chocolatey twist.
- Whipped cream for garnish – A classic topping for extra indulgence.
With these ingredients in hand, you’re ready to start making your cheesecake!
Step-by-Step Cherry Cheesecake Recipe
Now that we have all the ingredients, let’s dive into the process of making a perfect cherry cheesecake recipe from scratch. Follow these step-by-step instructions to ensure your cheesecake is smooth, creamy, and delicious.
Prepare the Crust
The crust serves as the base of the Cherry cheesecake Recipe, providing a firm foundation for the creamy filling.
Instructions:
- Preheat the oven to 325°F (163°C) and grease a 9-inch (23 cm) springform pan.
- In a mixing bowl, combine:
- 1 ½ cups (180g) graham cracker crumbs
- ¼ cup (50g) granulated sugar
- ½ cup (115g) melted butter.
- Press the crumb mixture firmly into the bottom of the springform pan, using the back of a spoon or a flat-bottomed glass.
- Bake for 10 minutes, then let it cool while you prepare the filling.
How to Make a Buttery Crust for Your Cherry Cheesecake Recipe
The filling is the heart of the Cherry cheesecake Recipe, providing the rich and creamy irresistible.
Instructions:
- In a large mixing bowl, beat the softened cream cheese (24 oz/680g) until smooth using an electric mixer (about 2 minutes).
- Add 1 cup (200g) granulated sugar and mix until well combined.
- Beat in 3 large eggs, one at a time, mixing just until incorporated.
- Stir in 1 teaspoon vanilla extract, ½ cup (120ml) sour cream, and 1 tablespoon lemon juice (optional).
- Scrape down the sides of the bowl to ensure everything is mixed evenly.
Bake the Cherry cheesecake Recipe to Perfection
To avoid cracks and achieve a silky-smooth texture, baking at the right temperature is crucial.
Instructions:
- Pour the cheesecake filling over the cooled crust, smoothing the top with a spatula.
- Prepare a water bath (optional but highly recommended for an even bake):
- Place the pan in a large roasting pan and fill the roasting pan with hot water until it reaches halfway up the sides of the springform pan.
- Bake at 325°F (163°C) for 55-65 minutes, or until the center is slightly jiggly but set.
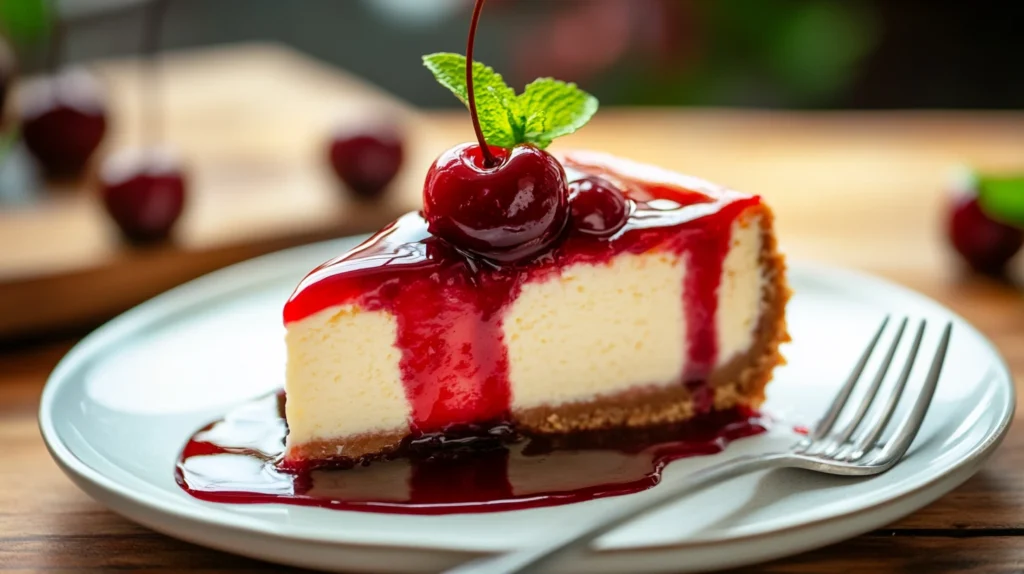
Preparing the Creamy Cheesecake Filling
The cherry topping adds a sweet and tart contrast to the creamy cheesecake.
Instructions:
- In a saucepan over medium heat, combine:
- 2 cups (480g) cherries (fresh or canned)
- ½ cup (100g) granulated sugar
- 1 tablespoon cornstarch
- ½ cup (120ml) water
- 1 teaspoon lemon juice
- Stir constantly and bring the mixture to a simmer. Cook until the cherries soften and the sauce thickens (about 5-7 minutes).
- Let the topping cool to room temperature before spreading it over the chilled cheesecake.
No-Bake Cherry Cheesecake Variation
If you’re short on time or don’t want to deal with baking, this no-bake cherry cheesecake is the perfect alternative. It’s creamy, refreshing, and incredibly easy to make, requiring only a few simple steps. Unlike the baked version, this cheesecake sets in the refrigerator, making it a foolproof option for beginners.
Ingredients for No-Bake Cherry Cheesecak
Crust:
- 1 ½ cups (180g) graham cracker crumbs
- ¼ cup (50g) granulated sugar
- ½ cup (115g) melted butter
Cheesecake Filling:
- 16 oz (450g) cream cheese, softened
- ¾ cup (150g) powdered sugar (for a smoother texture)
- 1 teaspoon vanilla extract
- 1 cup (240ml) heavy whipping cream, chilled
Cherry Topping:
(Same as the baked version)
- 2 cups (480g) cherries (fresh or canned)
- ½ cup (100g) granulated sugar
- 1 tablespoon cornstarch
- ½ cup (120ml) water
- 1 teaspoon lemon juice
Step-by-Step No-Bake Cheesecake Instructions
Make the Crust
- Combine the graham cracker crumbs, sugar, and melted butter in a bowl.
- Mix until the texture resembles wet sand.
- Press the mixture into the bottom of a 9-inch (23 cm) springform pan and smooth it out using the back of a spoon.
- Place the crust in the refrigerator for at least 20 minutes to firm up.
Prepare the Cheesecake Filling
- In a large mixing bowl, beat the cream cheese and powdered sugar until smooth.
- Add vanilla extract and mix well.
- In a separate bowl, beat the heavy whipping cream until stiff peaks form (about 3-4 minutes).
- Gently fold the whipped cream into the cream cheese mixture until fully combined.
Assemble and Chill the Cheesecake
- Spread the cheesecake filling evenly over the prepared crust.
- Smooth the top with a spatula.
- Cover the pan with plastic wrap and refrigerate for at least 4 hours, or overnight for best results.
Adding the Homemade Cherry Topping to Your Cheesecake
- Follow the same cherry topping recipe as in the baked version.
- Let it cool to room temperature.
- Spread it over the chilled cheesecake before serving.
Serving & Enjoying Your No-Bake Cherry Cheesecake
- Serve chilled for the best texture.
This no-bake version is just as delicious as the baked one but requires no oven time, making it a fantastic option for summer or when you need a quick dessert.
Cherry cheesecake pairs beautifully with other delicious desserts! If you love cheesecake variations, you might want to try this Easy Churro Cheesecake Recipe for a crispy, cinnamon-infused twist.
For a complete dessert spread, consider adding a batch of fudgy brownie cookies alongside your cheesecake—perfect for chocolate lovers!
Tips & Tricks for the Best Cherry Cheesecake Recipe
Making a perfect cherry cheesecake requires more than just following a recipe. The right techniques and little tricks can take your cheesecake from good to bakery-quality. Here are some expert tips to help you achieve the creamiest texture, smoothest filling, and most flavorful cherry topping.
1. Tips for a Perfect Cheesecake Crust
Use fine graham cracker crumbs – The finer the crumbs, the more compact your crust will be, preventing it from falling apart. You can use a food processor to get the best texture.
Press firmly but not too hard – Pressing the crust too tightly can make it hard to cut, while a loose crust may crumble. Use the back of a spoon or a flat-bottomed glass for even pressure.
Pre-bake for extra crispness – Even if you’re making a no-bake cheesecake, you can bake the crust for 5-7 minutes at 325°F (163°C) for a firmer base. Just let it cool before adding the filling.
2. Secrets for a Smooth & Creamy Cheesecake Filling
Use full-fat cream cheese – Low-fat versions won’t provide the rich and creamy texture that makes cheesecake so indulgent.
Let the cream cheese soften – Cold cream cheese can lead to a lumpy batter. Leave it at room temperature for at least 30 minutes before mixing.
Mix at low speed – Overmixing can incorporate too much air, leading to cracks in baked cheesecake. Use a low speed setting and mix only until the ingredients are combined.
Room temperature eggs are key – Cold eggs can cause the batter to curdle. Let them sit out for about 20 minutes before adding them.
Strain the batter for extra smoothness – If you notice lumps in your cheesecake batter, strain it through a fine-mesh sieve before pouring it into the pan.
3. Avoiding Cracks in Your Baked Cheesecake
Bake in a water bath (bain-marie) – Placing the cheesecake pan in a larger pan filled with hot water helps regulate temperature and prevent cracks.
Don’t open the oven door – Sudden changes in temperature can cause cracks. Check for doneness through the oven glass instead.
Run a knife around the edges – As the cheesecake cools, it may pull away from the sides of the pan and crack. Running a knife around the edges before chilling helps prevent this.
4. Enhancing the Cherry Topping
Use fresh cherries for the best flavor – While canned cherry pie filling is convenient, homemade cherry topping tastes much better.
Cornstarch is your best friend – It helps thicken the cherry sauce, giving it a glossy and rich texture.
Balance sweetness with lemon juice – A little acidity enhances the natural cherry flavor and prevents the topping from being overly sweet.
Add almond extract for a gourmet touch – A tiny ¼ teaspoon of almond extract enhances the cherry topping’s depth of flavor.
5. Storing and Freezing Your Cheesecake
Refrigerate for at least 4 hours before serving – Cheesecake is best when fully chilled, allowing the flavors to meld.
Store properly to keep it fresh – Cover the cheesecake loosely with plastic wrap or foil to prevent it from absorbing fridge odors.
Freeze individual slices for later – Wrap slices in plastic wrap and aluminum foil, then store them in an airtight container for up to 3 months.
Thaw cheesecake slices in the fridge – Avoid microwaving, as it can make the texture rubbery. Instead, transfer slices to the refrigerator the night before serving.
By following these expert tips and tricks, your cherry cheesecake will turn out perfectly creamy, smooth, and full of flavor every single time!
Cherry cheesecake is the perfect way to end a satisfying meal. If you’re looking for a savory main course before dessert, you can try something classic like this Macaroni Penne Recipe—a simple yet flavorful pasta dish that pairs wonderfully with a sweet treat afterward.
Frequently Asked Questions
Does cherry cheesecake need to be refrigerated?
Yes! Cherry cheesecake must be refrigerated because it contains cream cheese, eggs, and dairy, which are perishable. For best results, let the cheesecake chill for at least 4 hours (preferably overnight) before serving. Store it in the fridge, covered loosely with plastic wrap or foil, to maintain its freshness.
What is the secret to making good cheesecake?
The key to a perfect cheesecake is using high-quality ingredients, mixing gently, and baking at the right temperature. Here are some crucial secrets:
Use room temperature ingredients for a smooth filling.
Mix at low speed to prevent air bubbles and cracks.
Bake in a water bath to avoid drying out the cheesecake.
Cool gradually to prevent cracks.
Refrigerate for at least 4 hours before serving for the best texture.
How do you know when cheesecake is whipped enough?
For baked cheesecake, the batter should be smooth, thick, and creamy, with no lumps. If using whipped cream in a no-bake cheesecake, beat the cream until it reaches stiff peaks—this means it should hold its shape when lifted with a spoon. Overwhipping can make the mixture grainy, while underwhipping may result in a runny filling.
How long does homemade cherry cheesecake last?
Homemade cherry cheesecake stays fresh for:
✔ In the refrigerator: Up to 5 days, stored in an airtight container.
✔ In the freezer: Up to 3 months, wrapped tightly in plastic wrap and foil.
To serve frozen cheesecake, thaw it overnight in the fridge before enjoying it.
Conclusion
A cherry cheesecake recipe is the perfect way to create a rich, creamy dessert with a buttery graham cracker crust, a smooth cheesecake filling, and a sweet-tart cherry topping. Whether you choose a baked cherry cheesecake recipe or a no-bake cherry cheesecake recipe, following the right techniques ensures a flawless, restaurant-quality treat every time.
By using high-quality ingredients, mixing at low speed, baking in a water bath, and chilling thoroughly, you can achieve a rich, silky texture without cracks. And don’t forget the homemade cherry cheesecake topping—it elevates the flavor with fresh, vibrant cherries that canned versions just can’t match!
Now that you have all the cherry cheesecake recipe tips, tricks, and step-by-step instructions, it’s time to make your own delicious cherry cheesecake. Whether for a special occasion or just a treat for yourself, this dessert is guaranteed to impress.
Enjoy your homemade cherry cheesecake and happy baking! 🍒🎂
Classic Cherry Cheesecake Recipe – Rich, Creamy & Delicious
Equipment
- 9-inch springform pan
- Mixing bowls
- Electric mixer
- Spatula
- Saucepan
- Measuring cups & spoons
- Wire rack for cooling
Ingredients
- For the Crust:
- 1 ½ cups 180g graham cracker crumbs
- ¼ cup 50g granulated sugar
- ½ cup 115g unsalted butter, melted
- For the Cheesecake Filling:
- 24 oz 680g cream cheese, softened
- 1 cup 200g granulated sugar
- 3 large eggs
- 1 teaspoon vanilla extract
- ½ cup 120ml sour cream
- 1 tablespoon lemon juice optional
- For the Cherry Topping:
- 2 cups 480g fresh or canned cherries, pitted
- ½ cup 100g granulated sugar
- 1 tablespoon cornstarch
- ½ cup 120ml water
- 1 teaspoon lemon juice
- Optional Additions:
- ½ teaspoon almond extract for the cherry topping
- Whipped cream for garnish
Instructions
- Step 1: Prepare the Crust
- Preheat oven to 325°F (163°C) and grease a 9-inch (23 cm) springform pan.
- In a bowl, mix graham cracker crumbs, sugar, and melted butter until combined.
- Press the mixture firmly into the bottom of the pan.
- Bake for 10 minutes, then let it cool.
- Step 2: Make the Cheesecake Filling
- Beat softened cream cheese until smooth.
- Add sugar and mix until combined.
- Beat in eggs, one at a time, mixing gently.
- Stir in vanilla extract, sour cream, and lemon juice.
- Step 3: Bake the Cheesecake
- Pour the filling over the crust and smooth the top.
- Wrap the springform pan with two layers of aluminum foil and place it in a water bath.
- Bake for 55-65 minutes until the center is slightly jiggly.
- Turn off the oven and cool the cheesecake inside for 1 hour before refrigerating.
- Chill for at least 4 hours (preferably overnight).
- Step 4: Prepare the Cherry Topping
- In a saucepan over medium heat, mix cherries, sugar, cornstarch, water, and lemon juice.
- Stir constantly until the sauce thickens (about 5-7 minutes).
- Let cool before spreading over the cheesecake.
- Step 5: Serve & Enjoy
- Remove the cheesecake from the pan and slice.
- Garnish with whipped cream if desired.
- Serve chilled and enjoy your homemade cherry cheesecake!
Notes
Store in the refrigerator for up to 5 days or freeze for up to 3 months.
No-bake version: Use 1 cup (240ml) whipped cream instead of eggs and refrigerate for at least 4 hours instead of baking.