
Mac and cheese is a classic comfort food, but have you ever tried Tini Mac and Cheese? This Tini Mac and Cheese recipe takes the beloved dish to the next level, blending rich, creamy cheese with perfectly cooked pasta for an indulgent experience. Whether you’re making it for a cozy night in, a family dinner, or a gathering with friends, this recipe will quickly become a favorite.
What makes Tini Mac and Cheese special? It’s all about the perfect cheese blend, smooth and creamy sauce, and a few secret ingredients that add a unique twist. Whether you prefer the stovetop version or a baked, crispy-topped variation, this recipe will guide you step-by-step to achieving the ultimate mac and cheese experience.
Why You’ll Love This Recipe
Rich and Creamy Texture – The cheese sauce is silky smooth, coating every pasta piece perfectly.
Easy to Make – Simple ingredients and straightforward steps make this a beginner-friendly recipe.
Customizable – Want it spicy? Add jalapeños! Prefer extra crunch? Top it with crispy breadcrumbs.
Crowd-Pleaser – Perfect for potlucks, family dinners, or meal prepping.
Ingredients for a Perfect Tini Mac and Cheese Recipe
Before diving into the cooking process, let’s gather all the necessary ingredients. This recipe combines high-quality cheese, the perfect pasta, and a few secret ingredients to elevate the flavor.
Essential Ingredients
2 cups elbow macaroni (or preferred pasta shape) – Elbow macaroni is traditional, but shells or cavatappi also work well.
2 cups shredded sharp cheddar cheese.
1 cup shredded Gruyère cheese – Adds a smooth, nutty taste.
½ cup Parmesan cheese (grated) – Enhances the umami and richness.
2 cups whole milk – Creates a creamy base for the cheese sauce.
1 cup heavy cream – Adds extra richness and a silky texture.
2 tablespoons unsalted butter – Helps create a smooth sauce.
2 tablespoons all-purpose flour – Used for thickening the sauce.
1 teaspoon Dijon mustard – Adds a subtle tangy depth.
½ teaspoon garlic powder – Enhances the overall flavor.
¼ teaspoon ground nutmeg – A secret ingredient that gives warmth and depth.
Salt and black pepper to taste – Balances the flavors.
½ teaspoon smoked paprika (optional) – Adds a slight smokiness.
1 cup cooked bacon bits – For a smoky, crispy twist.
½ cup caramelized onions – Adds a hint of sweetness.
½ teaspoon truffle oil – Elevates the dish with a gourmet touch.
1 teaspoon hot sauce – For a spicy kick.
Toppings (For Baked Version)
1 cup panko breadcrumbs – Creates a crispy topping.
2 tablespoons melted butter – Helps brown the breadcrumbs.
¼ cup shredded cheddar cheese – Extra cheesiness on top.
Cheddar – A must-have for its sharp, bold taste. White or aged cheddar works great.
Gruyère – Melts beautifully and adds a slight nuttiness.
Parmesan – Brings in an umami depth and enhances the sauce.
Monterey Jack – A milder, creamier option that blends well with other cheeses.
Smoked Gouda – for a unique twist.
Pasta Selection for the Perfect Texture
The type of pasta you achieving the perfect mac and cheese texture. Here are some great choices:
Elbow Macaroni – Classic and holds sauce well.
Cavatappi – Spiral-shaped pasta that traps the cheese sauce.
Shells – Cup-like shape holds a good amount of sauce.
Farfalle (Bowtie) – A fun option that adds a different bite.
Step-by-Step Guide to Cooking Tini Mac and Cheese
Now that we have all the ingredients ready, let’s dive into the step-by-step process of making the perfect Tini Mac and Cheese. Whether you prefer a Tini Mac and Cheese recipe for a quick stovetop version or a Tini Mac and Cheese recipe with a crispy baked topping, this guide will cover both methods. Making Tini Mac and Cheese at home is simple when you use the right cheese blend and cooking techniques. No matter how you prepare it, this Tini Mac and Cheese recipe will always be rich, creamy, and satisfying.
Cook the Pasta
1️⃣ Bring a large pot of salted water to a boil.
2️⃣ Add the elbow macaroni (or preferred pasta) and cook until al dente (usually 1-2 minutes less than package instructions).
3️⃣ Drain and rinse with warm water to prevent sticking. Set aside.
💡 Pro Tip: Avoid overcooking the pasta, as it will continue to soften when mixed with the cheese sauce.
Make the Cheese Sauce (The Key to Creaminess!)
Stir in:
- 1 teaspoon Dijon mustard (adds a subtle tang).
- ½ teaspoon garlic powder (for extra depth).
- ¼ teaspoon nutmeg (secret ingredient for warmth!).
- Salt & black pepper to taste.
💡 Pro Tip: Keep whisking to prevent the sauce from burning or becoming too thick.
Add the Cheese
1️⃣ Lower the heat to low and gradually stir in:
- 2 cups shredded sharp cheddar cheese
- 1 cup shredded Gruyère cheese
- ½ cup grated Parmesan cheese
2️⃣ Stir gently until the cheese melts completely and forms a creamy, smooth sauce.
💡 Pro Tip: Add the cheese slowly and stir constantly to avoid clumps. High heat can cause the sauce to break.
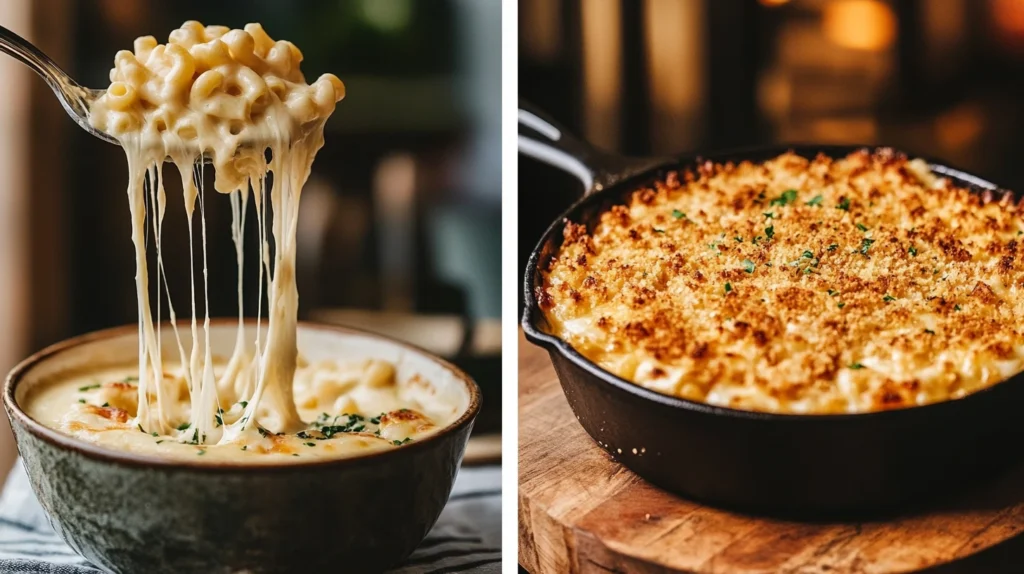
Combine Pasta and Cheese Sauce
1️⃣ Add the cooked pasta into the cheese sauce.
2️⃣ Stir until each piece of pasta is fully coated and creamy.
3️⃣ At this stage, you can mix in any optional add-ins like crispy bacon, caramelized onions.
✅ If you prefer stovetop mac and cheese, stop here and serve immediately.
✅ If you want a baked, crispy version, move on to the next step.
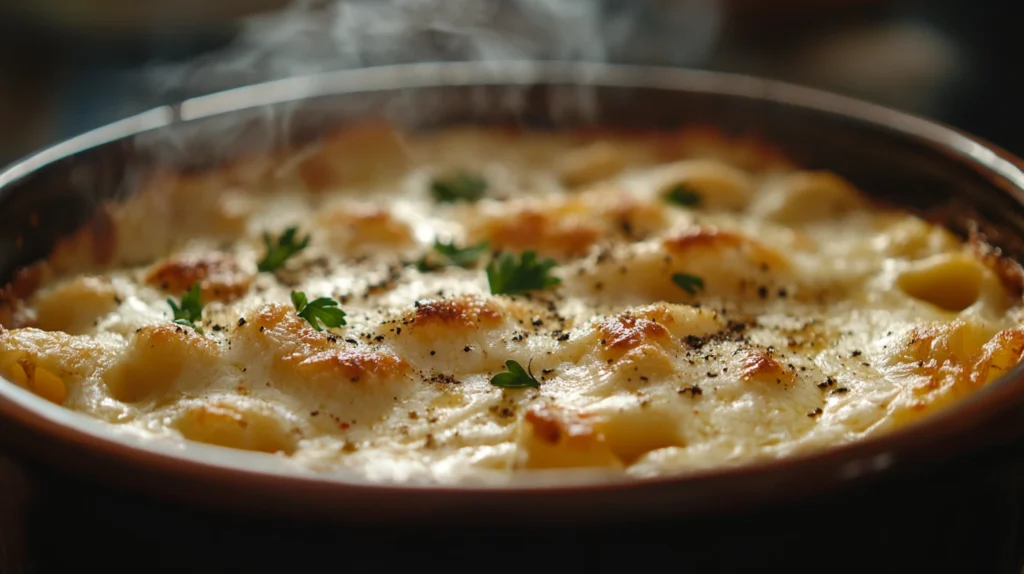
Baking for a Golden Crust (Optional)
Preheat your oven to 375°F (190°C).
In a small bowl, mix:
- 1 cup panko breadcrumbs
- 2 tablespoons melted butter
- ¼ cup shredded cheddar cheese
4️⃣ Sprinkle the breadcrumb mixture evenly over the mac and cheese.
5️⃣ Bake for 15-20 minutes or until the top is golden brown and crispy.
💡 Pro Tip: For an extra crunchy topping, broil for 1-2 minutes at the end.
Baking vs. Stovetop Mac and Cheese – Which One is Best?
| Method | Pros | Cons |
|---|---|---|
| Stovetop | Creamier texture, quicker to make | No crispy topping |
| Baked | Crispy, cheesy crust | Takes longer, slightly drier texture |
Both versions are delicious, so it depends on your personal preference!
Delicious Variations of Tini Mac and Cheese Recipe
One of the best things about Tini Mac and Cheese is its versatility. You can customize it in countless ways to suit your taste preferences, dietary needs, or even the occasion. Below are some delicious variations to try!
Spicy Tini Mac and Cheese 🌶️🔥
If you love a little heat, this spicy version will take your mac and cheese to the next level.
How to Make It Spicy
Add spicy cheese – Replace part of the cheddar with pepper jack or habanero cheese.
Mix in hot sauce – Stir in 1-2 teaspoons of hot sauce (like Frank’s RedHot, Tabasco, or Sriracha) when adding the cheese.
Add fresh or pickled jalapeños – Dice 1 fresh jalapeño or ¼ cup of pickled jalapeños.
🔥 Extra Kick: Top with crushed Flamin’ Hot Cheetos instead of breadcrumbs for a bold, spicy crust!
Vegan or Dairy-Free Tini Mac and Cheese 🥦🌱
Want a plant-based version? No problem! You can still enjoy creamy, cheesy mac without any dairy.
Extra Flavor Boost
Add roasted garlic for depth.
Mix in pureed butternut squash or pumpkin for a natural creaminess.
Stir in smoked paprika to give it a more complex flavor.
🌱 Bonus: For a protein boost, add sautéed mushrooms, spinach, or roasted chickpeas.
Protein-Packed Mac and Cheese 🍗🥓🦐
Looking to add some extra protein? Here are some fantastic options:
Meat Add-Ins
Crispy Bacon: Chop and mix in 1 cup of crispy cooked bacon for a smoky crunch.
Grilled Chicken: Slice and add 1 cup of seasoned grilled chicken.
Ground Beef: Brown ½ pound of ground beef with seasoning and mix it in.
Buffalo Chicken: Toss shredded chicken with buffalo sauce and mix into the mac and cheese.
Seafood Twist
🦐 Garlic Butter Shrimp: Sauté 1 cup of shrimp in butter and garlic, then mix into the dish.
🦀 Lobster Mac and Cheese: Stir in ½ cup of chopped cooked lobster for a luxurious upgrade.
🥩 Pro Tip: If adding meat, make sure it’s cooked separately before mixing it in to avoid overcooking.
Healthy Mac and Cheese (Lower-Calorie Option) 🥕🥦
Want to enjoy mac and cheese without overloading on calories? Try these healthy swaps!
Lower-Calorie Substitutions
Use whole wheat pasta or chickpea pasta for more fiber and protein.
Swap out heavy cream with Greek yogurt or low-fat milk.
Reduce cheese by half and add pureed cauliflower or carrots for creaminess.
Use almond flour instead of regular flour for thickening the sauce.
🥦 Bonus: Add steamed broccoli, peas, or spinach to sneak in extra veggies!
Mac and Cheese Bar – Perfect for Parties! 🎉🍽️
Hosting a gathering? Set up a Mac and Cheese Bar where guests can customize their bowls with toppings!
Topping Ideas:
🧀 Extra Cheese (cheddar, parmesan, blue cheese crumbles)
🥓 Crispy Bacon Bits
🌶️ Jalapeños or Hot Sauce
🥦 Steamed Broccoli or Roasted Veggies
🍤 Shrimp or Grilled Chicken
🥨 Crushed Pretzels or Cornflakes (for crunch)
💡 Pro Tip: Serve mac and cheese in mini cast-iron skillets or ramekins for a restaurant-style presentation.
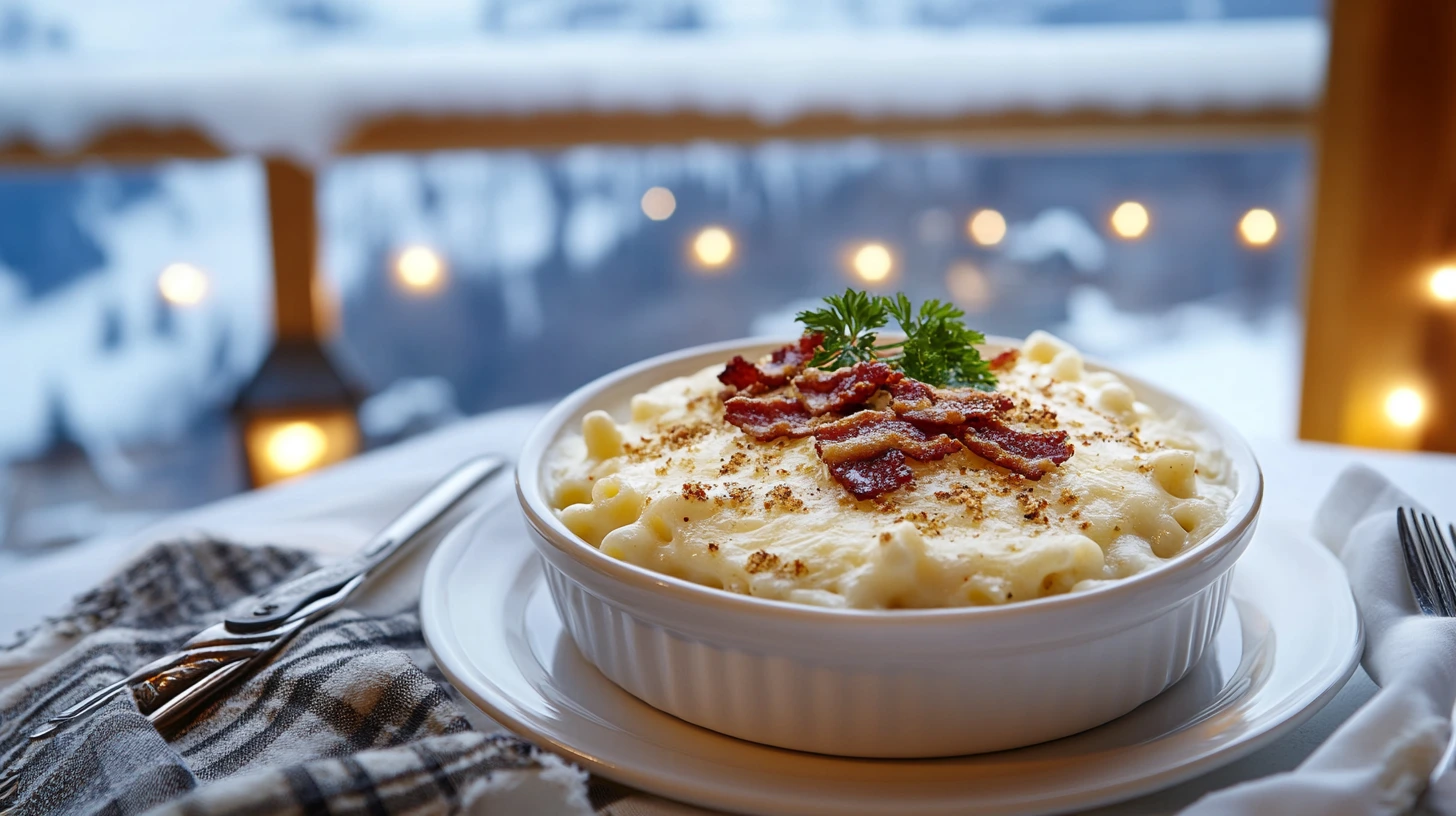
Serving and Reheating Tini Mac and Cheese
Now that you’ve mastered the perfect Tini Mac and Cheese, it’s time to serve your Tini Mac and Cheese recipe in style! Whether you’re making Tini Mac and Cheese for a simple weeknight meal or preparing for a special occasion. A well-plated Tini Mac and Cheese recipe not only looks appetizing but also enhances the overall experience of enjoying Tini Mac and Cheese.

How to Plate Mac and Cheese Like a Pro
Use a Shallow Bowl or Small Cast-Iron Skillet – This keeps the cheese sauce evenly distributed.
Garnish for Color and Contrast – Sprinkle fresh parsley, chives, or green onions on top for a pop of color.
Top with Crunchy Elements – Finish with crushed toasted breadcrumbs, crispy onions, or crushed pretzels for an added crunch.
💡 Pro Tip: Serve Tini Mac and Cheese in a hollowed-out bread bowl for a fun and unique presentation!
Perfect Side Dishes to Serve with Mac and Cheese
Want to make this meal complete? Pair your mac and cheese with these delicious sides:
Vegetable Sides 🥦
Roasted Brussels Sprouts – Their crispiness complements the creamy pasta.
Garlic Butter Green Beans – Adds a fresh, crunchy contrast.
Simple Side Salad – A light salad with lemon vinaigrette balances out the richness.
Protein Pairings 🍗
Crispy Fried Chicken – A classic combo with creamy mac.
BBQ Pulled Pork – The smoky-sweet flavors pair perfectly.
Pan-Seared Salmon – A lighter, protein-packed option.
Bread Pairings 🍞
Garlic Breadsticks – Perfect for scooping up extra cheese sauce.
Buttery Biscuits – A soft, flaky addition to your meal.
💡 Pro Tip: Serve mac and cheese family-style in a large skillet with toppings on the side for guests to customize their plates!
Making Mac and Cheese Ahead of Time
Need to prep in advance? Here’s how to store and reheat mac and cheese without losing its creamy texture.
How to Store Leftovers
Refrigerator: Store in an airtight container for up to 4 days.
Freezer: Place in a freezer-safe dish and freeze for up to 2 months.
💡 Pro Tip: If freezing, store without breadcrumbs and add them fresh when reheating!
Pair this Tini Mac and Cheese with a Seafood Salad for a fresh contrast or serve it alongside a Steak Quesadilla for a hearty meal!
For a sweet finish, try a Brownie Cookie or an Easy Churro Cheesecake to complete your meal.
Frequently Asked Questions
1. What cheese does Tini use?
Tini Mac and Cheese typically features a blend of sharp cheddar, Gruyère, and Parmesan for a rich, creamy, and well-balanced flavor. However, you can customize the cheese mix based on personal preference. Some variations may include Monterey Jack, smoked gouda, or Velveeta for extra creaminess.
2. Can Tini’s Mac and Cheese be reheated?
Yes! Tini Mac and Cheese can be reheated while maintaining its creamy texture. Here’s how:
Stovetop (Best Method): Add a splash of milk or heavy cream and reheat over low heat, stirring frequently.
Oven: Preheat to 350°F (175°C), cover with foil, and bake for 15-20 minutes until warm.
Microwave: Heat in 30-second intervals, stirring in between, with a splash of milk to prevent dryness.
💡 Pro Tip: Avoid overheating, as it can cause the cheese to become grainy or separate.
3. How long is uncooked mac and cheese good for?
Uncooked dry pasta (store-bought) lasts 1-2 years in a cool, dry place.
Homemade uncooked mac and cheese (assembled but not baked) can be stored in an airtight container in the refrigerator for up to 2 days before baking.
Frozen uncooked mac and cheese can last up to 2 months if properly sealed.
💡 Pro Tip: If making mac and cheese ahead of time, store the cheese sauce separately and mix it with fresh-cooked pasta when ready to serve for the best texture.
4. How long can homemade mac and cheese sit out?
Homemade mac and cheese should not sit out for more than 2 hours at room temperature. After that, bacteria can grow rapidly, making it unsafe to eat.
If left out:
✅ Under 2 hours – Safe to refrigerate and reheat.
❌ Over 2 hours – It’s best to discard it to avoid foodborne illness.
💡 Pro Tip: If serving at a party, keep mac and cheese warm in a slow cooker or on a warming tray to maintain its temperature.
Conclusion
Tini Mac and Cheese is the ultimate comfort food—rich, creamy, and endlessly customizable. Whether you prefer Tini Mac and Cheese classic, spicy, baked, or loaded with add-ins, this Tini Mac and Cheese recipe guarantees a delicious result every time.
Next time you’re craving a warm and cheesy dish, try this Tini Mac and Cheese recipe and make it your own with your favorite ingredients. Don’t forget to experiment with different cheeses, proteins, and toppings to create your perfect version of Tini Mac and Cheese.
Enjoy your homemade Tini Mac and Cheese! 🧀✨

Tini Mac and Cheese Recipe – Creamy, Cheesy & Irresistible!
Equipment
- ✔️ Large pot (for boiling pasta)
- ✔️ Saucepan (for making cheese sauce)
- ✔️ Whisk (for smooth sauce mixing)
- ✔️ Baking dish (for the baked version)
- ✔️ Mixing bowls (for breadcrumb topping)
Ingredients
- Pasta & Cheese
- 2 cups elbow macaroni or preferred pasta shape
- 2 cups shredded sharp cheddar cheese
- 1 cup shredded Gruyère cheese
- ½ cup grated Parmesan cheese
- Sauce Base
- 2 cups whole milk
- 1 cup heavy cream
- 2 tablespoons unsalted butter
- 2 tablespoons all-purpose flour
- Seasonings & Flavor Enhancers
- 1 teaspoon Dijon mustard
- ½ teaspoon garlic powder
- ¼ teaspoon ground nutmeg
- ½ teaspoon smoked paprika optional
- Salt & black pepper to taste
- Optional Add-ins
- 1 cup cooked bacon bits for a smoky flavor
- ½ cup caramelized onions
- ½ teaspoon truffle oil for a gourmet touch
- 1 teaspoon hot sauce for a spicy kick
- For the Baked Version
- 1 cup panko breadcrumbs
- 2 tablespoons melted butter
- ¼ cup shredded cheddar cheese for extra cheesiness
Instructions
- Step 1: Cook the Pasta
- Bring a large pot of salted water to a boil.
- Add elbow macaroni and cook until al dente (1-2 minutes less than package instructions).
- Drain and rinse with warm water to prevent sticking. Set aside.
- 💡 Pro Tip: Cooking the pasta al dente ensures it doesn’t become mushy when mixed with the cheese sauce.
- Step 2: Make the Cheese Sauce
- In a large saucepan, melt butter over medium heat.
- Add flour and whisk continuously for 1 minute to create a smooth paste (roux).
- Slowly pour in milk and heavy cream, whisking constantly to prevent lumps.
- Simmer for 2-3 minutes until slightly thickened.
- Stir in:
- Dijon mustard (adds tangy depth)
- Garlic powder (enhances flavor)
- Nutmeg (adds warmth)
- Salt & black pepper to taste
- Step 3: Add the Cheese
- Reduce heat to low and gradually stir in:
- Cheddar cheese
- Gruyère cheese
- Parmesan cheese
- Stir gently until the cheese melts completely into a smooth, creamy sauce.
- 💡 Pro Tip: Add cheese slowly and stir constantly to prevent clumps or separation.
- Step 4: Combine Pasta & Sauce
- Add cooked pasta into the cheese sauce.
- Stir until each piece of pasta is fully coated and creamy.
- Mix in optional add-ins like crispy bacon or hot sauce.
- ✅ If you prefer stovetop mac and cheese, stop here and serve immediately.
- ✅ If you want a baked, crispy version, continue to the next step.
- Step 5: Baked Version (Optional)
- Preheat oven to 375°F (190°C).
- Transfer mac and cheese to a buttered baking dish.
- In a small bowl, mix:
- Panko breadcrumbs
- Melted butter
- Shredded cheddar cheese
- Sprinkle the breadcrumb mixture over the mac and cheese.
- Bake for 15-20 minutes until the top is golden brown and crispy.
- 💡 Pro Tip: For an extra crunchy topping, broil for 1-2 minutes at the end.
Notes
Avoid pre-shredded cheese, as it contains anti-caking agents that affect melting.
Store leftovers in an airtight container in the fridge for up to 4 days.
To reheat, add a splash of milk and warm on low heat, stirring frequently.